Last Updated: June 30th, 2026
The following steps will show you how to register, configure and connect ECOLOG-PRO devices. ECOLOG-PRO family includes ECOLOG-PRO RBR, 1NTR, 2PTR and 1THR.
1. Account Setup and Initial Configuration in elproCLOUD
If you have not yet created an account, please be sure to follow these steps:
- Creating a new elproCLOUD account: How to register an elproCLOUD account
- Configuring Limit Profiles: How to manage upper and lower limit profiles
- Configuring Issue Profiles: How to manage Issue profiles
- Adding users who should receive alarm notifications: How to operate the user management
- Prepaid credit (unlesse you set up "Credit Card" as your payment method): Invoices & Cards
2. Install the communication module ECOLOG-PRO RBR
-
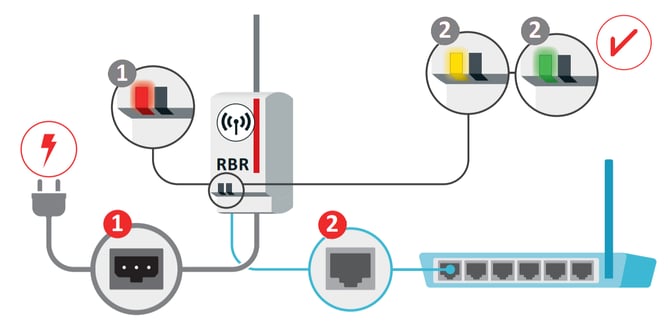
Plug in your ECOLOG-PRO RBR using the power supply unit provided with your device. Depending on the region you are in, there might be different adapters to allow connection to your local socket.
-
As a result, the ECOLOG-PRO RBR's left LED will turn red.
-
Connect the ECOLOG-PRO RBR to the internet by connecting it to your modem, router or local network. You may use the Ethernet cable provided with your Starter Kit. If you use an Ethernet cable longer than 3 meters, make sure to use a shielded cable.
-
As a result, the ECOLOG-PRO RBR's left LED will first turn yellow, indicating that it is connected to the internet, and finally green, indicating that it could connect to elproCLOUD.
-
The left LED on the RBR indicates its connection to elproCLOUD:
-
red = powered, but no network connection
-
yellow = connected to the network, not (yet) connected to elproCLOUD
-
green = connection to elproCLOUD established
-
-
The right LED turns green as soon as the first 1NTR has been connected and indicates communication activity by short blue blinks. So the ideal picture in normal operation is two green LEDs on the RBR, while the right LED changes to blue for a short blink from time to time.
If your RBR light does not turn green or you have general difficulties establishing a successfull connection with elproCLOUD, please read this article on how to set and check your network settings
3. Configure an ECOLOG-PRO Radio measurement module
Step 1: Add your sensor to the dashboard
-
Go to your dashboard in elproCLOUD

-
Click on Add sensor
-
Enter the unique serial number of the sensor. You can find the serial number on the module's front. Your module will be identified automatically.

☝️ Each sensor can only be set up once in one account.
Step 2: Configure Sensor basics

-
Choose which Sensor Channel you would like to configure (only applies to ECOLOG-PRO 2PTR and ECOLOG-PRO 1THR)
-
Enter your preferred Sensor name (default: device ID).
-
Set the logging interval (default: 10 min). The logging interval determines how often the sensor logs temperature/humidity.
Once the logger has been configured, the logging interval cannot be modified during reconfiguration. In that case, the logger must be either retired or deleted, which results in the loss of the license.
-
Enter optional information, such as Customer's ID or a memo text.
-
Click Next.
Step 3: Enter optional Metadata

-
You can enter optional information, such as location, room, fridge ID, and other identifiers.
Important: Metadata 2-8 fields are not predefined. Define and document internally what each metadata field represents to ensure they are used consistently to avoid misassignments.
Step 4: Set Alarm limits

- Click on Use Limit Profiles to enable this feature.
- Select required limit profile from the dropdown.
- Select the notification type (email and/or SMS) and assign recipients using the dropdown menu (registered users only).
- Click Next.
Step 5: Set Sensor issues

-
Click on Use issue profiles to enable this feature.
- Select required Issue profile from the dropdown.
- Select the notification type (email and/or SMS) and assign recipients using the dropdown menu (registered users only).
-
Click Next.
Step 6: Check the summary page and apply the configuration

- Select your preferred payment method. In order to adjust your available payment methods, please refer to our article on Invoices & Cards settings.
-
If you have a voucher, you may redeem it by entering the code in the corresponding field. Click Submit.

-
Accept the privacy policy & terms of use.

-
Click Buy and start sensor and follow the instructions to connect your measurement module.

4. Connect your ECOLOG-PRO temperature sensor
Having finished registration, make sure that you have defined the sensor's settings in the elproCLOUD software and that the "Add sensor" wizard shows the image displayed below. This gives you a 10 days time frame to connect your module via the following steps.
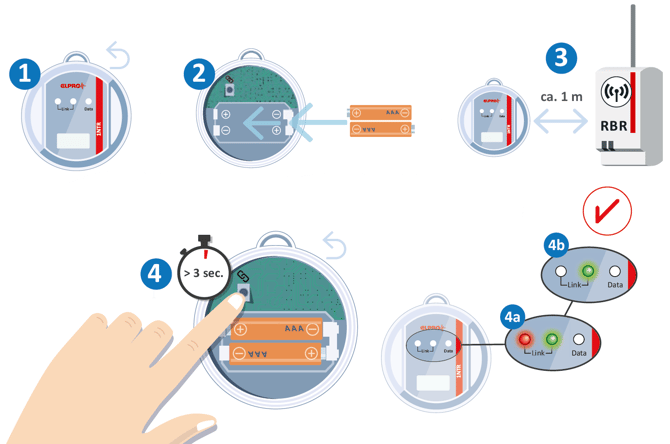
👉 For ECOLOG-PRO 1NTR
-
Open the sensor module's screw cap.
-
Insert the two batteries.
-
Bring the sensor module close (approximately 1 meter) to an ECOLOG-PRO RBR connected to elproCLOUD.
-
Press the button inside the sensor module for more than 3 seconds.
-
As a result, the two LEDs "Link", one in red and one in green, will start to blink. As soon as only the green LED blinks, the module has been connected successfully.
-
Close the sensor module's screw cap and position the sensor to its intended location.
👉 For ECOLOG-PRO 2PTR
-
Remove the screw on the front and open the measurement module's cover.
-
Insert the three AA batteries.
-
Bring the measurement module ECOLOG-PRO 2PTR in close proximity (approximately 10 cm) to an ECOLOG-PRO RBR connected to elproCLOUD.
-
Press and hold the "Connect" button inside the measurement module for more than 3 seconds. The left LED will blink red 3 times.
-
Wait until the left LED starts flashing red (once per second).
-
A successful connection will be indicated by the left LED illuminating in green for 10 seconds. Afterwards, the left LED will be flashing green every 10 seconds.
-
Close the communication module's cover and tighten the screw. Place the module in its intended location (e.g. storage room, next to your ultra-freezer or cryo container, etc.).
If only the left LED is blinking in red, your module ECOLOG-PRO 1NTR/2PTR/1THR has not connected successfully to the communication module ECOLOG-PRO RBR.
In order to connect your moduel, please bring it again close to the communication module, approx. 10cm, and press the "Connect" button again for 3 seconds. The sensor is reset and will try again to connect.

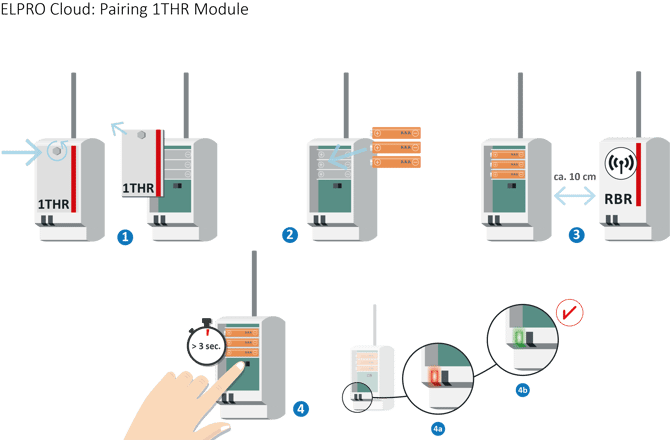
👉 For ECOLOG-PRO 1THR
-
Remove the screw on the front and open the measurement module's cover.
-
Insert the three AA batteries.
-
Bring the measurement module ECOLOG-PRO 1THR in close proximity (approximately 10 cm) to an ECOLOG-PRO RBR connected to elproCLOUD.
-
Press and hold the "Connect" button inside the measurement module for more than 3 seconds. The left LED will blink red 3 times.
-
Wait until the left LED starts flashing red (once per second).
-
A successful connection will be indicated by the left LED illuminating in green for 10 seconds. Afterwards, the left LED will be flashing green every 10 seconds.
-
Close the communication module's cover and tighten the screw. Place the module in its intended location (e.g. storage room, laboratory, server room etc.).
If only the left LED is blinking in red, your module ECOLOG-PRO 1NTR/2PTR/1THR has not connected successfully to the communication module ECOLOG-PRO RBR.
In order to connect your moduel, please bring it again close to the communication module, approx. 10cm, and press the "Connect" button again for 3 seconds. The sensor is reset and will try again to connect.